Navigation menus provide a way for the user of your site to access different areas of the site. A navigation menu is a series of links, which can take the user to a page, post, a collection of posts, a form, or almost any other online location. A WordPress site has at least one navigation menu, called the primary menu, but many themes offer additional navigation menu options, such as a secondary menu or footer menu.
When you are building your site, think about how you want users to navigate through the site, and that will guide the menu structure.
Primary Menu
You will need to set at least one menu for your site, the Primary Menu. This menu will display at the top or side of each page on the site, depending upon the theme. As the name implies, this menu will be the primary way that users will navigate around your site. The menu can list items in any order, normally from more important on the left (top for side navigation), to less important on the right (bottom). You can optionally have a Home link on the left, though that is not necessary if your header image contains a homepage link.
Menu items can consist of:
- Links (both on- and off-site)
- Posts
- Pages
- Categories
For themes using Full Site Editing, the navigation menu is contained within a Navigation Block, which is commonly used within the Header and Footer templates, and can be edited following these instructions. For older themes, go to the WordPress dashboard, and click on Appearance/Menus to edit the menu (see below) or you can access navigation menus by going through the theme Customize menu.
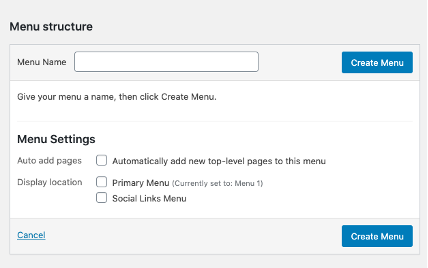
To build the menu from the WordPress dashboard, go to Appearance/Menus. The first time you create the menu, enter a name in the Menu Name Field, and then click “Create Menu.” You can choose the display location for the menu, which should be checked as Primary Menu for the primary navigation menu. You can also choose whether to automatically add new pages to the primary menu.


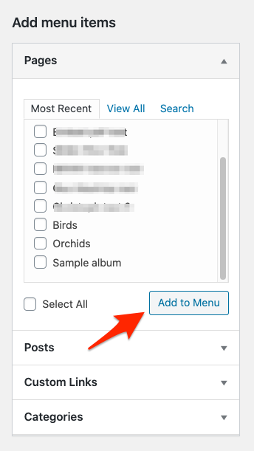
Once you have created the menu, you will build it by adding menu items in the left frame. Choose either a page, post, custom link or category, and click on “Add to Menu.”
After you have created a list of items, you can then arrange the order by dragging and dropping. If your theme supports it, you can also create sub-menus by dragging an item to the right as shown below.
To delete an item from the menu, click on the triangle to expand the frame, and select “Remove.” Make sure to click on “Save Menu” after any changes.
Additional Menus
Your theme may support additional menus, as shown in the image below. These are usually located in the footer or as a smaller menu in the header. If using multiple menus, think carefully on how you want to structure the site and direct users through your content. Use the Manage Locations tab to control the location for each menu.


